SHARPENING
Clive R. Haynes FRPS
The most usual form of sharpening in Photoshop is via Filter > Sharpen > 'Unsharp Mask'. The term, a seeming contradiction, originates from the print industry and relates to the sharpening that can be given to an image by combining the effects of a sharp original and a lighter, softly focussed, unsharp version.
When opening the Unsharp Mask dialogue box we find three levels that can be set. These are 'Amount', 'Radius' and 'Threshold'.
Amount: This determines the amount to which you wish to sharpen - the higher the value, the more sharpening.
Radius: This determines the thickness of the edges to be sharpened. The lower the value, the sharper the edge effect. Higher values thicken the edge and increase contrast.
Threshold: This determines at what point the filter is applied. A low value ensures all pixels are sharpened. Increasing values gradually change the point at which the filter is applied. Higher values require more contrast & brightness to respond.
What
settings are best?
This will depend upon the resolution of the image,
however as a general guide, here are some settings:
Amount: Between 50 and 100
Radius: Between 1 and 2
Threshold: Zero.
'Do
it in two goes'
It is
generally considered better to add two small amounts of sharpening by re-applying
the filter than to do it all in one application.
For instance, say an image
needed a factor of 100 (Amount) and 1.2 (Radius).
Apply it first as Amount:
50, Radius:1.2, then do it again as: Amount: 50, Radius:1.2
The best way to discover what settings are best is to experiment.
An improved method of Unsharp Mask Sharpening
To avoid sharpening the colour information which can cause 'colour noise', sharpening is often better carried out in the monochrome section of the image. To do this the image must be converted from 'RGB' to 'Lab' mode. RGB refers to the Red, green and Blue colour channels, whilst 'Lab' refers to 'L', the Lightness channel, and 'a' & 'b' the two colour channels that accompany it.
When converting from RGB to Lab, remember that the conversion will affect some of the layer information. You may wish to 'Flatten' the image first.
To change to Lab mode, go to Image > Mode > Lab
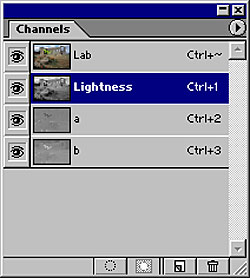
When in Lab mode go to 'Channels'
In the 'Channels' palette, click in the grey area of the 'Lightness' channel, ensuring that all the 'eye' icons remain visible - so that the other channels remain available, see below

Go to Filter > Sharpen > Unsharp Mask and apply the filter at the level you require
This now only sharpens the Lightness (monochrome) information and provides a better form of sharpening
You can continue to work in Lab mode but some functions and filters will not operate with Lab. To return to RGB go to Image > Mode > RGB
NB:Swapping from one mode to another, in this case from RGB to Lab and back to RGB again results in image information being lost. Usually the 'loss' is imperceptible' but nevertheless it's still there.
Other, alternative methods of 'sharpening' are listed below.
| Related
Topics |