Digital Infrared Photography
A Personal Workflow
Clive R. Haynes FRPS
Stage 2: Photoshop
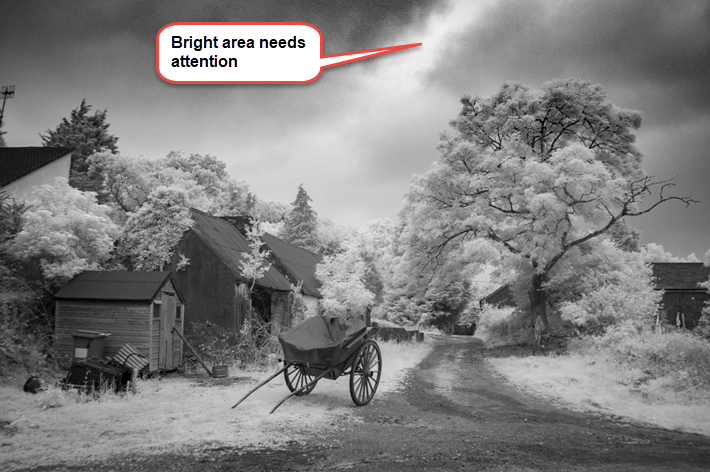
Taking the image into Photoshop allowed me to remove the distracting elements within the scene. I improved the sky by selecting part of the over-exposed area and filling with Edit > Fill > Contents > Content Aware > OK. This tool produces a very smooth, invisible transition.

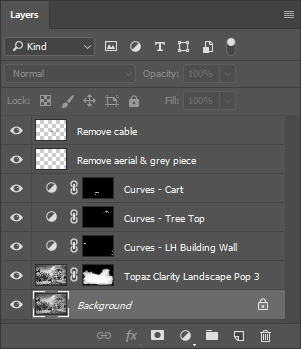
After copying the Background Layer, Topaz 'Clarity' plug-in was used to give more contrast detail.
Using three 'Curves' Adjustment Layers and associated masks I carefully refined the tones of the cart and top of the tree then to darken the light section of wall on the left-hand building. Yes, this could have been done in Lightroom but I I chose this moment to carry out the work.
My next task was to remove the TV aerial. With the uppermost Curves Adjustment Layer active, I used the 'Stamp Visible' facility which is quickly accessed by Ctrl+Shift+Alt+E (which merges all visible Layers creating its own new layer).
Stamp Visible can be accessed another way but it's even less intuitive. For the sake of completeness this is what you do: Activate the top Layer whether it's an image Layer or an Adjustment Layer. Go to the top menu, click on Layer > Merge Visible, keep holding down the left mouse button and click Alt. Release the mouse and you get Stamp Visible. I've no idea why this very useful feature is made rather obscure by Adobe.
To continue: Using the Stamp Visible Layer I selected the aerial with the Lasso tool then I applied Content Aware Fill as described earlier.
The general area around the now invisible TV aerial was selected with the Lasso and 'Inverted' (Select > Inverse / Ctrl+Shift+I) to produce the reverse selection. The area was then deleted using the Delete Key. This disposed of unnecessary image pixels which would otherwise increase file size.
I repeated the Stamp Visible method to remove the small light grey rectangle on the box by the small shed. For reasons of clarity I've labeled the two (Stamp Visible) Layers in the Layers stack.
A comment about the above 'Stamp Visible procedures:
Frequently when editing in Photoshop one doesn't always realise 'repair work' needs to be done until layers have been added for various reasons. At this point 'repairs work' to a lower layer may not be practical, also unless Image Layer Masks are temporarily disabled, tools such as Clone Stamp, Healing Brush and Content Aware Fill, may not function through insufficient pixel information. In such cases a 'Stamp Visible' Layer is invaluable. As an example of this useful practice and as this was, effectively, a 'live' workflow, it was included it in this exercise.
The image was saved as a .PSD file.
For more details about Layer Mask and Stamp Visible, refer to my Know-How section contents list.
For details about Topaz Plug-Ins refer to the Topaz link on my Homepage.

Stage 3: Lightroom:
Returning to Lightroom I further tonally balanced the picture to add subtle emphasis where needed. The finished images was ready for printing.
