Digital Infrared Capture & Workflow
Clive R. Haynes FRPS
In The 'Old Days'
In common
with many
photographers in this 'digital age', I spent my formative years using
black & white film and darkroom-based techniques whilst also enjoying
parallel activities with colour transparencies and audio-visual work.
My darkroom-based work caused me to experiment with infrared film,
notably Kodak High-Speed IR. I found the medium to be risky, wayward,
constantly 'exciting' and hugely unpredictable. There was all the business
of loading the camera in the dark (using a 'changing bag' on location),
focusing, then, re-focusing to the 'red spot' on the lens, fitting
the opaque filter to the lens and guessing the exposure. Then back in
the darkroom the film was processed using one's preferred developer
and, subject to the usual oddities encountered with IR, a number of
usable negatives resulted. All this gave a certain mystique to the
adventure of capturing images in IR.
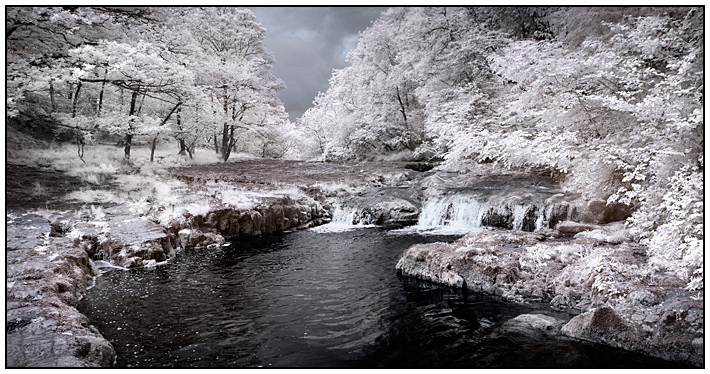
The first photographs made by infrared radiation were made in the late 19th century with the first documented published infrared photograph in 1910 by Robert Williams Wood (1868-1955). Wood was an American physicist and professor of optical physics. He had been fascinated by what he called “invisible rays” and was credited with the discovery of electromagnetic radiation beyond the visible spectrum. He developed photographic emulsions to capture this radiation and produced the first photographs of both infrared and ultraviolet radiation. The photographs exhibit the characteristic whitening of healthy foliage which became known as the “Wood Effect” and it remains one of the distinctive features of many infrared pictures.
Infrared film for general use has been around since about the 1930's - indeed, television pioneer, John Logie Baird carried out experiments with an IR video system ('Noctovision'). The movie industry used IR to shoot 'day for night' to simulate moonlit scenes in black and white films. IR therefore has a long pedigree, the scientific community have long known of its properties as a recording medium for 'thermal imaging' and the like and 'serious photographers' have enjoyed its eerie and lyrical attributes for landscape work in particular. I certainly enjoyed the very special qualities of IR and when making the change to a digital camera system I realised that this was one aspect of film-based photography that I would very much miss. I looked forward to resuming infrared photography one day. That day did indeed arrive - and it's continued to evolve.
What is Infrared?
- A short technical excursion
The technicalities need to be brief, but for those wishing more
detail, plenty of information is published and easily available via the
Internet.
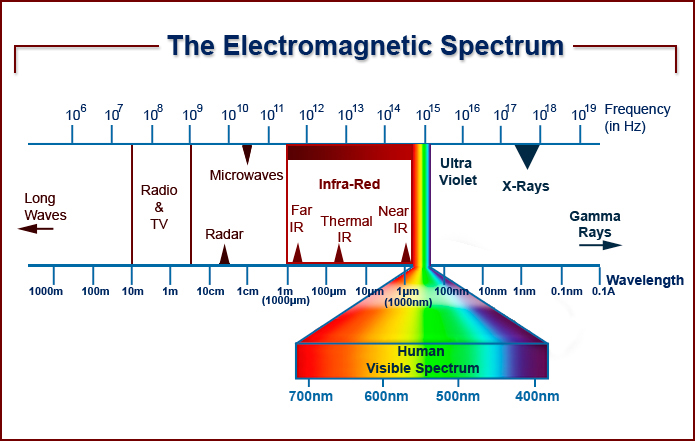
'Visible light' is the small part of the very wide electromagnetic spectrum - and as the words suggest, it's the part that human vision is able to detect. 'Visible light' is then further broken down into the spectrum of colours that we can readily identify, from red, through orange and yellow, to green and so through blue, indigo and violet. Red is at the low-frequency end with corresponding longer wavelengths of light, and blue is at the high-frequency end with shorter wavelengths. Infrared falls in the low-frequency section just beyond visible red. The wavelengths are measured in nanometres and for IR photography we're looking at something in the region of 700nm and longer.
The diagram of the Electromagnetic Spectrum below gives an indication of how small an area 'visible light' represents and the position of infrared.
Digital
Cameras and Infrared
Digital cameras using CCD and CMOS chips are sensitive to the 'near infrared'.
To avoid corrupting the image by unwanted infrared frequencies, an IR blocking filter is built in to the
camera body. The strength of the filter varies from make to make and model
to model. However, as the 'blocking filter' isn't 100% effective, it's possible to shoot IR on many cameras with such a filter
by using a method similar to film. It's achieved by fitting an opaque (IR) filter to the front of the lens
and using a long exposure. Indeed I have done this but it lacks the speed
and spontaneity of 'straight-shooting', plus there are risks of unreliable focus, 'fogging'
and flare spots. When moving from film I could have sought one of the few
IR cameras available (at a price), which offer 'direct-viewing IR'. However,
I preferred to buy a DSLR camera and have it converted to dedicated
IR use and I continue to recommend this approach.
My first camera to be converted was a Nikon D70, being both affordable and readily convertible. I evolved to a Nikon D200 then a D300. I'm now using a converted Sony A6300 with highly satisfactory results.
There are kits are available for DIY conversion but it's far preferable to send the camera body to a specialist. (See note at base of page). A specialist will carefully adjust to ensure that whilst IR is focused upon the array, the viewfinder image remains sharp. No refocusing is necessary, you can rely upon what you see and use auto-focus with no problem. However with 'mirror-less' cameras the potential differential in focus point between array and mirror is not a problem. A reliable specialist will carry out the conversion in a dedicated dust free environment, ensure a blemish-free filter is chosen, offer to set the white-balance as a preset and provide a guarantee of work.
One of the benefits of using a digital camera is being able to see the IR result immediately, check the histogram and feel confident.
Choice of IR Filter
Depth: 720nm, 830nm or something else?
When deciding to have a camera converted for IR, take a moment to consider
the depth of the filter you need. Usually the choice is 720nm or 830nm. There are other options - see the link in this section.
Which one to choose? Deeper into IR is not necessarily better - it's simply different. If you prefer a deeper filter to 'see' further into the infrared, it comes at a price. The price is one of recording an image that will be pretty well monochromatic, revealing little or no 'false-colour' characteristics. Although monochrome is what one expects from IR, the image file recorded is actually in colour and at 830nm there's just less available for selective tweaking. However, at 720nm, near-IR frequencies contribute to the attractive properties of 'Channel Swapping' and associated manipulations. So if you wish to utilise the pictorial effects and alternative colour tonalities of 'Channel Swapping' or 'Lab Color Mode', then a 720nm filter could serve you better. Admittedly this is a personal view but one born of experience and many colleagues agree with me. However there is a note here. Depending upon the camera that is converted and the vintage and make of the sensor, results will differ. Broadly speaking, the sensor types in older camera models work better for 'channel swapping'. the 'new and improved' sensors whilst offering other advantages of design exhibit far less options for this function. From this point of view therefore, the difference between 720nm and 830nm has effectively been reduced.
One of the fascinations of recording a scene in IR is that the world is revealed with a different tonal response to that with which we're familiar. In this respect no one can tell you that it's 'incorrect'. How you record and adjust the tones and manage so-called 'false colours' is entirely your own affair and the product of your artistic judgment and aesthetic sensibility. Longer wavelength filters below 720nm are also available. These are at the edge of the red end of the visible spectrum and the results are colourful variations in so-called 'false colour'.
For a more detailed look at choices of filter, including 590nm, 665nm, 720nm, 780nm, 830nm and 'quartz glass / full spectrum' use the link below.
White Balance
For best results, it's essential to make a pre-set 'white balance' for
IR and your chosen specialist should be able to do this for you using a constant, calibrated light source apparatus. However should you wish to do it yourself it's is simple to do. Here's the basic procedure that you'll
need to adapt for your model of camera.
Set the camera to
measure the White Balance in sunlight
Point the camera to a patch of grass so that it completely fills the
viewfinder
Seriously defocus the image
Measure / set the white balance (tip: You may need to under or over-expose
for this test to gain a setting)
Save as a 'Custom Setting'
Make the 'Custom Setting' your normal 'White Balance'
Setting a custom white balance helps in presenting more meaningful information for the camera-based histogram. A custom white balance will typically provide a more evenly distributed channel-to-channel histogram for each of the three RGB channels and thereby, a more favourable tonal range for initial adjustments in 'RAW' and future image management.
RAW or JPEG?
I prefer to shoot with RAW files as they offer greater flexibility and
control. However, if your camera permits simultaneous jpeg images to
be recorded, then use the facility, as the standard rendering of the
IR image by jpeg often gives a pleasing split-tone result. This is visible
both when inspecting the image in-camera and as a 'thumbnail' via the
computer file-browser and of course, in 'Lightroom' and 'Bridge' (ACR). This facility gives
a useful indication about how the image could appear as a split-tone
without 'Channel-Swapping'.
JPEG files can be used but offer less flexibility when we need to exploit the range of tones, some of which will frequently be 'off the scale' both for JPEG and the in-camera histogram display.
DI - IR Camera-Conversion
Specialist:
More information about Advanced Camera Services can be found at:
www.advancedcameraservices.co.uk
or by 'phone: 01953 889324
When making contact with a member of the ACS technical or sales team, do mention my name.
What Follows ..............
Having whetted your appetite for infrared photography there are several options from this point.
Information about the range of filters suitable for IR photography.
Comparisons between IR converted cameras
Step-by-step details about my present monochrome workflow, my approach to image management and how I use Lightroom, Photoshop and suitable plug-ins to achieve the best result.
Learn about 'Channel Swapping' including the option to process as monochrome.
Questions and queries about lens 'Hot-Spots', Bit Depth and Gamut
Working in Lab Mode to reveal the fantastic world of 'false colour'.
Galleries with a few of my infrared images.
All links below............