Digital Infrared Capture & Workflow - continued
Hot-Spots,
Flares, Bit Depth & Gamuts
and the
Adventures Working in 'Lab Color Mode'
Clive R. Haynes FRPS
Hot-Spots, Occasional
Flares and Softness
Earlier, I mentioned that, unlike the days of film-based infrared photography,
DI capture is now far less wayward and more predictable. This is certainly
true, but only to a point. From time to time one can still encounter
the odd and unexpected quirk from IR capture. This usually stems from
the fact that we're asking the camera to record a range of tones (light)
beyond the spectrum that the camera and lens combination would have
been designed for (visible light 400nm - 650nm).
Hot Spots
A common occurrence is that of a 'hot-spot', that is to say a circular
light-toned area usually noticeable in the centre of the image. In my
experience is was far more apparent when using a non-IR converted digital
camera where an opaque filter had been fitted to the lens to ensure
that only IR is transmitted. However, I have noticed the occasional
barely discernable hot-spot using my IR-converted Nikon D70. This is
not a fault with the camera or the IR conversion or even with the lens
(although IR may exaggerate a tendency inherent in any given lens that
is not discernable under normal, visible-light, conditions). I found
that the hot-spot can occur only under certain exposure conditions and
that it's largely unpredictable. Fortunately the occurrences are rare
and when they do occur can be readily dealt with some deft tonal correction
work (levels and/or curves) in Photoshop. Hot-spot problems are usually
more pronounced apertures from, say, f8 or f11 and beyond, so unless
depth of field is critical, a wider aperture will reduce the hot-spot
considerably. Odd streaks and flares also may be experienced from time
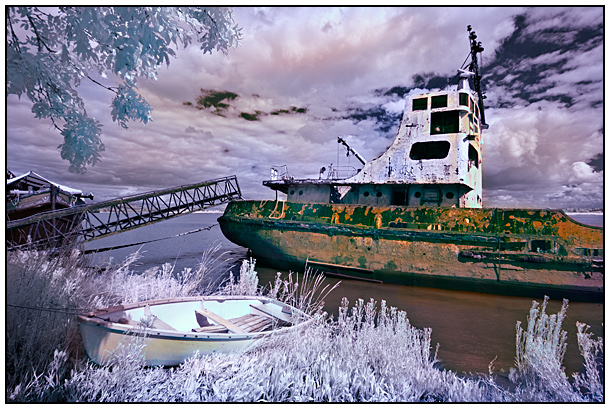
to time - again a vagary of IR capture. The severe 'hot-spot' illustrated
in Fig 1, occurred when shooting with a non-IR converted camera, using
an opaque (IR) filter and stopping down to f32.
This is the other occasional problem. Sometimes, although one is absolutely certain that the focus was accurate; the image appears soft and the focus a little off. A specialist-company IR converted camera will have been carefully adjusted to compensate for 'back-focus. Should softness occur, the 'error' is probably the result of the auto-focus mechanism simply getting it slightly wrong from an infrared point of view. When using a zoom lens the 'error' may not be constant or apparent at all focal-lengths. Only by experimentation will this become evident. If in doubt, stop-down to a considerably smaller aperture to gain greater depth of field or use manual focus with a guestimate as to the forward or backward tweak required. There's also the consideration that not all lenses will transmit IR wavelengths the same or as effectively. Even one's most favoured and expensive lens may not perform as well as expected at the IR end of the spectrum. This is hardly surprising considering that the manufacturer would have been primarily concerned with ensuring the fidelity of the optics for visible light.
Bit Depth
For better image processing, fidelity and control, 16 bit working is preferred.
Set your RAW file reader to open as 16 bit and remain with 16 bit operation
until you feel that further tonal and colour adjustment will not benefit
from continued 16 bit working. At this point you may choose to swap to
8 bit working (Image > Mode > 8 bit). Also you may wish to save on file
size and utilise features only available in 8 bit.
Modes
There are some advantages to working in 'Lab mode' (Image > Mode > Lab
Color) and these are worthy of exploration. Lab mode separates Lightness
(L) from the two colour channels - those of magenta/green (a) and blue/yellow
(b). The separation of 'L', 'a' and 'b' allows the colour channels to
be adjusted independently of the Lightness channel. For example, you may
wish to invert (make negative) Lightness only, or invert one or both colour
channels. The effects can be weird and bizarre but for the right image,
the results can be both striking and successful. Changing the tonal response
of Channels depends upon one's previsualisation of the outcome and a willingness
to experiment. Exploring
'Lab mode' presents a whole new palette of possibilities, more of which
shortly but first a short note about 'gamut'.
Gamut
Modifying and extending the image histogram, converting to other 'modes'
and applying unusual processes, can sometimes result in a wider than anticipated
colour gamut. It may therefore be preferable to alter the colour profile
of the image to one which offers a greater colour-space. Many photographers
will already be using Adobe RGB (1998) as the default colour space as
this is frequently preferred to the more modest sRGB space, however for
some images and procedures, wider gamuts such as Pro Photo RGB may be
preferable. To change the colour profile: go to Edit > Convert to Profile
and make your choice. Experimentation will be the key. Note: for output
to currently available and affordable inkjet printers, the results of
opting for wider gamuts may not be apparent in the final print. However,
for good practice, one should maintain maximum fidelity throughout the
image workflow so far as is practicable, bearing in mind that other applications
and high-end commercial printers can take advantage of wider gamuts and
more accommodating colour spaces.
Click the link below to continue and discover more about 'Adventures with Lab Mode'