Luminosity Masks continued
Clive R. Haynes FRPS
At this point it's a good idea to create Dark or Shadow area Luminance Masks as they could be useful. To do this:
Ctrl-Click on the Channels RGB thumbnail. Marching ants will appear in many parts of the image. These once again reveal 'Highlights'. See below.
With the 'Marching Ants' running, The next task is to save the selection as an Alpha Channel. In the Channels Palette, click on the 'Save selection as Channel' icon and an Alpha Channel will appear. This will be familar as it's the same method as used for the first 'Highlights' Channel Luminance Mask.
The next step is to make the series of new Alpha Channels (Luminance Masks).
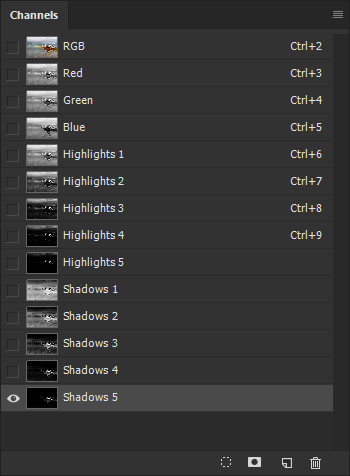
Proceeding as for the 'Highlight' set of Luminance Masks follow the same method of repeatedly holding down Ctrl+Alt+Shift and clicking upon the preceding Alpha Channel thumbnail, creating a new Alpha Channels, naming and continuing this until 'Shadows 5'. See below.
It doesn't matter what you name each Channel, 'Shadows' or 'Dark' or something else. Choose whatever suits you.
The next stage is to create a Midtone Luminance Mask which is is surprisingly useful. This is what to do::
Begin by selecting the entire image, Ctr+A.
Then with Ctrl+Alt, click on the first Highlights Channel thumbnail (Highlights 1).
Next, Subtract the first Shadow Channel (Shadows 1) by Ctrl+Alt clicking upon the thumbnail.
At this point a warning box will probably appear about 'no pixels more than 50% selected. Selection will not be visible'. It simply means the channel when selected won't display 'marching ants'.
Click 'OK'.
![]()
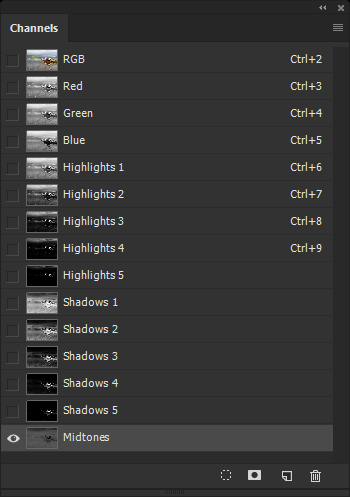
Click on the RGB Channel and if the screen goes red, click off the 'eye' icon on the 'Midtones' Luminace Mask to render it invisible.
Going through all these steps to make a series of Luminosity Masks for each image could be tedious, so why not create an 'Action' and let Photoshop produce all the steps for you. Simply 'run' the Action each time you need it.
Once you have a set of Alpha Channels it's simple to reveal each as a 'selection' by Ctrl - clicking on any one.
The whole purpose of the exercise is produce accurate selections. Once the selection is revealed as 'marching ants' it can be applied as an Adjustment Layer to target the selected area.
Parts of the image that do not require adjustment can be edited out. First click on the appropriate Alpha Channel and choose a suitable size Brush. Using black as the foreground colour areas of the Alpha Channel can be rendered black and therefore 'hidden'. Alternatively, to preserve the original Channel, an edited copy could be made. Simply drag the Alpha Channel to the New Channel icon (next to the trash bin) and rename it.