DODGING & BURNING-IN
USING
GRADIENTS & LAYER MASK TECHNIQUES
Clive R. Haynes FRPS
Dodging & Burning
People familiar with standard wet-darkroom practice will recognise the terms of 'dodging' & 'burning-in'.
'Dodging' reduces the amount of light falling on an area and so the exposure is less and the section of the print is lighter.
'Burning-in' allows more light to fall upon an area of the print giving more exposure and the section of the print is darker.
The effect is just like sunburn - more light, the darker; less light, the lighter.
| On the Photoshop Tool Bar, the 'Dodger' tool looks like this | whereas the 'burning-in' tool looks like this |
So to locally lighten or darken an area use the appropriate tool. Unlike the darkroom however, the tonal range can be determined so that the 'dodger' or the 'burner' can be used to predominately affect Highlights, Midtones or shadows. These choices appear on the options bar (V6) or in the Options Palette (V5). In addition the amount of 'exposure' may be set as a percentage. See illustration below.
Gradients
When we need to progressively lighten ('dodge') or darken (or 'burn-in') an area, a preferred method of working is by using the Gradient tool. This is especially useful for areas of sky or foreground for instance where we wish to 'contain' the image. The 'Gradient' allows a smooth transition from light tone to dark. Gradients have a variety of uses and can be many styles or produced from different colour combinations. However for the purposes of this exercise, we'll restrain ourselves to using black only and choose the 'Linear Gradient'.
 Left: The Gradient Tool selected, showing
the styles of gradient available (V6). The choices for V5 can be viewed by clicking
on the Gradient Tool and dragging to the right. The one chosen is the 'Linear
Gradient'.
Left: The Gradient Tool selected, showing
the styles of gradient available (V6). The choices for V5 can be viewed by clicking
on the Gradient Tool and dragging to the right. The one chosen is the 'Linear
Gradient'.
For the purposes of 'Dodging' and 'Burning-in' I usually set the tool opacity to around 30% and use the 'Foreground to Transparent' setting with the Foreground colour, black.
 Left: The range of different gradient
colours and presets available (V6). 'Foreground to Transparent' is top row, second
from left. For V5, these choices appear in the Options Palette.
Left: The range of different gradient
colours and presets available (V6). 'Foreground to Transparent' is top row, second
from left. For V5, these choices appear in the Options Palette.
For this exercise we'll darken a sky.
With the chosen image open, add a new (empty) layer above the picture
On our new layer, set the foreground colour to black.
With the gradient tool selected, choose the 'Linear Gradient' and select 'Foreground to Background' and (for my choice) the 'Reverse' option ticked (see Options Bar - V6, Options Palette - V5). On the Options Bar (Options Palette V5) set the Opacity to 30%.
Draw a line from the point where the gradient will end to the point where the gradient will start (this point could even be outside the 'Window' for the image). If you 'draw' in the wrong direction, the wrong part of the image is darkened - should this occur, go to Edit > Undo (Ctrl + Z), reverse your direction and try again!.
By using a relatively low opacity (around 30%) you can make successive 'grads' to build-up the effect.
As the gradients are on their own layer (or layers if you require several 'grads' in different areas), the opacity of the layer may be reduced if required.
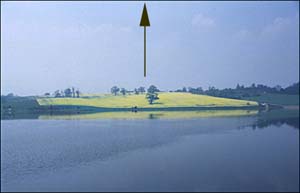 |  | |
| Arrow
indicates direction of Gradient application |
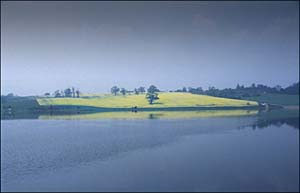
Landscape
with Gradient darkened sky |
An Alternative Working Method
Using a Gradient on a Quick Mask
This method does offer a little extra flexibility
Using a marquee tool, and define the area to which you wish to apply the gradient
Go to 'Quick Mask' (bottom of Photoshop Tool Bar and click on the right-hand icon) - immediately the 'unselected' area will go red.
![]() The
'Quick Mask' icon buttons. The one to the right turns Quick Mask 'on', the one
to the left returns you back to the 'selection'
The
'Quick Mask' icon buttons. The one to the right turns Quick Mask 'on', the one
to the left returns you back to the 'selection'
Next, with the mask visible (red), go to the Gradient tool and using the Black-to-White setting drag the gradient across the area where you wish the mask to be, in effect, this will 'feather' the mask / selection and the red area will extend
Next, click on the left 'Quick Mask' button and the selected area will be revealed as 'marching ants', complete with its 'feather' (so the area will appear smaller than the original)
Go to Image > Adjust > Brightness & Contrast and adjust the settings until the gradient effect is as you require (you may prefer to work in 'Levels' or Curves', or any other image adjustment - the choice is yours).
Tip: To observe the effect of the gradient without the marching ants', 'hide' the selection before going to 'Image > Adjust etc', use Ctrl + H
When everything is as you wish, deselect (Ctrl + D)
One advantage of this method, is that you can observe the changes taking place within the image as the Image > Adjust, adjustments are made. However, the results are not the same as for the previous method as 'Image Adjust', etc is not the same, image-wise, as adding a tone/colour to an additional layer.
A further refinement of either Gradient method above is to utilise the benefits of 'Layer Masks' and 'Adjustment Layers' as these allow many other options and more refined adjustments. Details of both can be found in the 'Layer' links below.
GRAY FILL & LAYER MASK TECHNIQUE - A flexible method of 'Dodge' & 'Burn'
This method is particularly useful as it allows us to recover the areas we 'dodge' or 'burn' and tackle them again. It uses the technique of 'Layer Mask' and the results are different to the Gradient method described above. This technique operates much more like the 'Dodge' & 'Burn' tools on the Photoshop tool bar as it doesn't give a grey to black overlay. It's not better than the other techniques, it's different and in some instances more appropriate for a specific area.
This is what you do.
Create a new (empty) layer above the image layer.
Go to Edit > Fill > and in the dialogue box that appears, choose Contents, Use (drop-down menu) 50% Gray > OK
Grey now fills the screen. Fear not! In the Layers palette, go to the Blending Modes ( the little horizontal box, top left of the palette with 'Normal' showing) and click on the drop-down arrow. From the list that appears, select 'Overlay' and presto - the grey disappears!
Choose a suitable brush and a lowish opacity / pressure and with black as the foreground colour and white as the background colour, you can 'dodge & 'burn-in' to your hearts content - and changing between black & white f/g to b/g swaps between 'dodge' (white) and 'burn' (black). As the results of your efforts are on a layer, they can be altered in overall opacity or deleted if required.
Adding a Gradient
A gradient can also be added to the gray, dodge / burn layer we've just created or indeed another new (Gray / Overlay blend) layer could be introduced to carry the Gradient effect.
To apply the gradient, use the Gradient tool set at black to white (in the Options Bar - V6 / Options palette - V5.5).
Applying black will progressively darken whilst white will lighten. As it's a true 'dodge & burn' (in the Photoshop sense) the results are different to the Gradient-on-a-Layer method described above. Once again, it's a matter of 'horses for courses'.
| RELATED
TOPICS |