Making an Anaglyph (red/cyan) 3D picture
Please Note:
There are two methods to make a 3D red/cyan anaglyph image. One uses 'Channels' and the other is via 'Levels'. Photoshop users can choose either but 'Elements' users must use the 'Levels Method' until 'Channels' become more accessible in that program. Both methods will make excellent anaglyphs.
Click link below for the 'Levels Method'
'Channels Method' follows below:
What follows looks long-winded because I've detailed every step. In practice the whole process is very quick and I can run through it all, from opening the images, to the final 3D version , ready to print, in less than two minutes - honestly!
Colour or Monochrome?
The method below describes how to make a monochrome 3D image. Try this
first and get used to the idea, then have a go with colour and miss out
desaturation in steps 3 & 9.
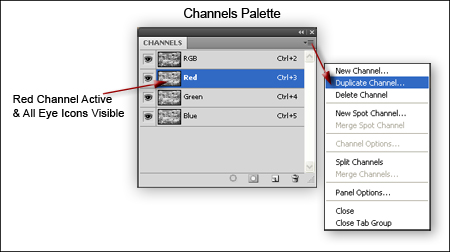
Before you begin, make certain that the Channels palette is visible (if you can't see it go to Window > Channels)
Open the 'left' and 'right' images in Photoshop in the usual way.
NB Should the images be RAW or JPEG files, save them as .PSD (Photoshop) files. (If the images remain as JPEGs, the 'Duplicate Channel' functions listed below will not function correctly.)
Make any obvious corrections, bearing in mind that the two images will ultimately overlap each other to form a single optical composite.
NB Do not make any alterations to the pixel dimensions either by 'Cropping' or 'Transformation' at this stage.
If alterations are made, the 'Duplicate Channel' functions listed below will not function correctly.
Go to the 'left' image and de-saturate it. Do this via Image > Adjust > Desaturate (Ctrl + Shift + U)
Go to the Channels Palette and click on the RED Channel (it highlights in blue). NB At all times for this method, when activating the required Channel, keep each eye icon visible for all Channels
Go to the drop-down menu arrow at the top right of the Channels palette and click. In the menu that opens choose 'Duplicate Channel' - see below
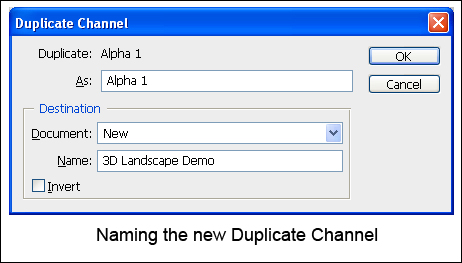
In the dialogue box that opens go to the Document box and click on the drop-down arrow and choose 'New'
In the 'Name' box (not the 'document' box), type in the name of the image you are working on. (If you've already saved the left and right originals then choose another file name otherwise the system may not accept it). Click 'OK'. A new monochrome (Alpha Channel) image will appear. See screen-grab below for example:
Minimise or close the 'left' original. Keep the new Alpha Channel (monochrome) image open
Go to the 'right' image and Desaturate it. Do this via Image > Adjust > Desaturate (Ctrl + Shift + U)
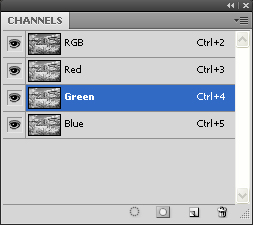
Go to the Channels Palette and click on the GREEN Channel (it highlights in blue). Remember to keep all the eye icons visible, see below
Go to the drop-down menu arrow at the top right of the channels palette and click. In the menu that opens choose 'Duplicate Channel'
This time in the dialogue box that opens, go to the 'Document' box, click on the drop-down arrow and choose (click on) the file name you gave in step 7. Click 'OK'
Go back to the 'right' original and repeat steps, 10, 11, 12 this time selecting the BLUE Channel in step 10
Minimise or close the right original
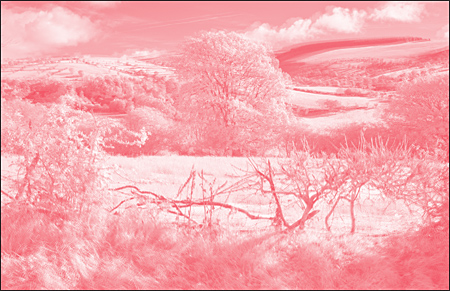
Go to the Channels Palette and make certain that all the eye icons for the Red, Green and Blue Channels are visible. The (monochrome) Alpha Channel image, created from the three separate colour Channels (red = left, green & blue (cyan) = right), will appear as overlapping images with a pink hue and not stereo-looking at all. The three Alpha Channels have created a 'Multichannel' image and we need to change this to RGB. Go to > Image > Mode > RGB and as if by magic, the monochrome image becomes a red/cyan anaglyph!
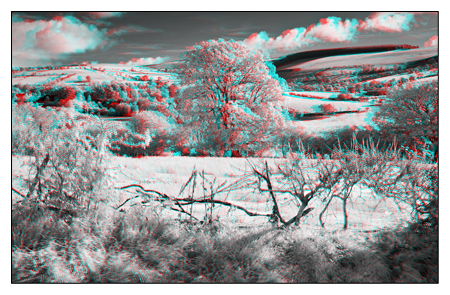
Put on your stereo red/cyan spectacles and view in glorious 3D
All should be well but some adjustment may be necessary. See 'tweaks' on the next page.