Making 3D (Anaglyph) Pictures

The Red / Cyan using 'Levels Method'

Clive R. Haynes FRPS

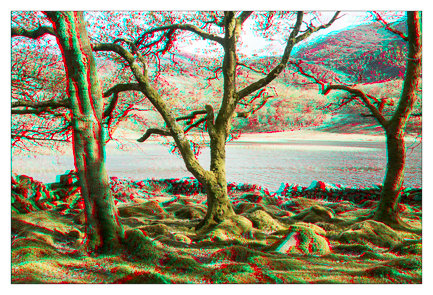
To view the above image in 3D you'll need red/cyan 3D specs
Red lens to left eye

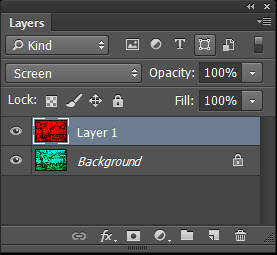
This method has the advantage of being compatible with Adobe Elements

After taking two images of the same scene from the same position but three inches apart (for convenience, take the left image first so you'll know which is which).

Open the right-hand (RH) image

Open the left-hand (LH) image

We need to copy this image:  Select > All (Ctrl + A)

Copy by Edit > Copy (Ctrl + C)

Go to right-hand image

Edit > Paste (Ctrl + V)

Layer 1 is the left-hand image

Switch off Layer 1 (LH image) by clicking on the Eye icon

Activate (click on) Background Layer (RH image)

Go to Image > Adjustments > Levels

 
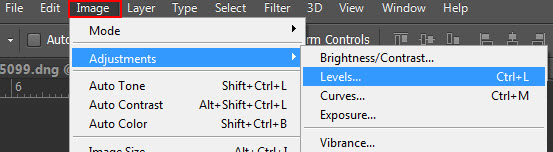
In the Channels option, choose Red

Move the right Output slider to the left, making both Output Levels 0 (zero)


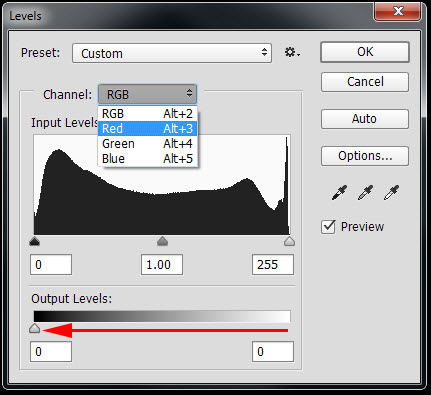
Click 'OK'

The image now becomes a cyan hue

Switch on (Eye icon) Activate Layer 1 (LH image)

Go to Image > Adjustments > Levels

In the Channels option, choose Blue

Move the right Output slider to the left, making both Output Levels 0 (zero)

In the Channels option, choose Green

Move the right Output slider to the left, making both Output Levels 0 (zero)

The image now is overall red in hue


Click 'OK'

With Layer 1 active

Go to the Blend Mode option at top left area of Layer palette and using the drop-down menu change 'Normal'  to 'Screen' blend mode


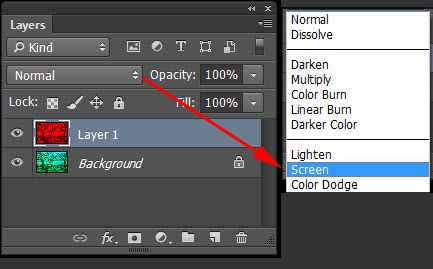
You now have a 3D anaglyph (red/cyan)


On Layer 1 (LH image) make corrections of left-right, up-down positioning with the Move Tool or angle corrections  by Edit > Transform > Rotate

This and other useful advice including information about how to get red/cyan 3D specs is on the next page, 'Tweaks and Adjustments', click the 'Continue' link below

 
Continue
Know-How Contents
Homepage
e-mail CRHfoto