Shadow & Highlight Adjustment (continued)
Clive R. Haynes FRPS
Shadow
/ Highlight
The two basic controls of Shadows and Highlights may well
be all you need to adjust to improve the tonality of the image but it's well worth
exploring a little further and discovering how the other controls can boost your
picture. I describe below how the additional adjustments can affect your images.
Both 'Shadow' and 'Highlight' sections include 'Tonal Width' and 'Radius' controls.
Tonal
Width
This allows the range of tones selected by the Shadow/Highlight
'sliders' to be broadened or lessened. You may wish to improve detail in the very
darkest sections without affecting the mid-tones of the image.
Radius
This control doesn't specifically address the tonal value but targets
the area around the pixels that have been adjusted either spreading or reducing
the influence on the surrounding pixels.
Take care when applying the amount of Shadow / Highlight adjustment as 'halos' can appear around sections of the picture. The two controls that have most influence upon the 'halo effect' are 'Amount' and 'Radius'. It pays to take care with the adjustment otherwise the result can appear similar to the 'halos' generated if an image is over-sharpened.
Colour
Correction
There's also a control to adjust colour - in essence it can
boost or diminish colour saturation. It may be helpful if the result of managing
the contrast range results in an unwanted increase in colour saturation.
Midtone
Contrast
This allows a further refinement in adjusting tone. It's worth
remembering, however, that it only applies to areas affected by the Shadow / Highlight
settings.
Here you can set the 'Clip' values of the highlights and shadows. The 'clipping' will set the range of light and/or dark values that will be applied to the updated black and white values as set the adjustments as they are made.
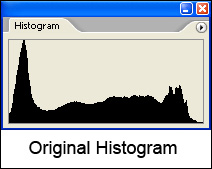
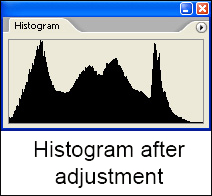
The two 'screen-grabs' below illustrate the way in which the histogram is improved.
Depending upon the image it will probably be good practice in most cases to apply the Shadow / Highlight changes to a copy of the picture (no matter what the image, this advice is generally sound practice thus preserving a version of the 'original'). Situated upon a layer above the original, the 'improved copy' allows a Layer Mask may be applied for selective editing and blending if required.