When working on an image we frequently need to define the are we wish to target for changes, adjustemnt and cut-out. The operation can be simple or complex - it all dependsupon the subject and what needs to be done. The range of choice can look something like this:
The whole image -
easy
A well-defined part of the image, eg a door in a building -easy
Several well-difined parts of an image eg doors and windows in a building
- easy
An irregular shape such as hills in a landscape - fairly easy
A complex irrigular shape such as an urban landscape with rooflines, distant
trees and hills - much less easy
A very complex irregular shape such as the branches of a tree set against
the sky - difficult
A confused and irregular shape, for example, the leaves of a tree set
against a complex background - much more difficult
A fuzzy irregular shape such as hair either in a studio portrait (easier
to control) or in a candid shot - very difficult
As you can see from the above short list, there's not going to be one easy answer for all possibilities. The complextity of different sorts of shape, texture and definition is one reason why we have a number of tools and methods within Photoshop for making a selection to be as accurate as possible.
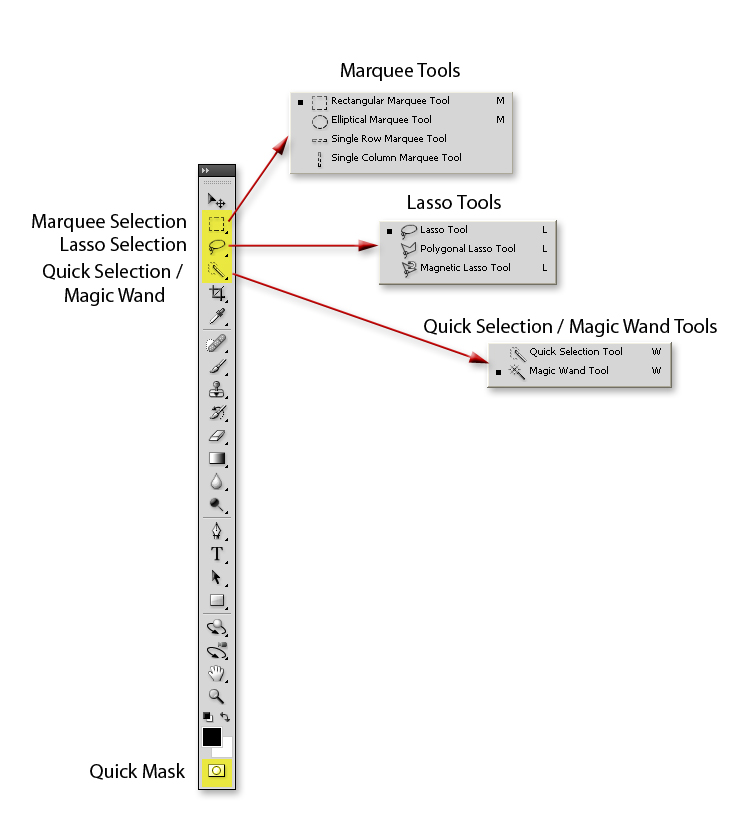
The choice of method falls into roughly three areas, making a 'selection' with one of the 'selection tools', defining a 'path' or using a 'mask'. Each method has its merits and advantages and some people will favour one over another. We all have our preferences and most of us use a combination of methods to achieve a result. In this introduction, we're going to explore the basic selection tools and understand their application. The basic selection tools are:
Marquee Selection: Rectangular or Eliptical (ignor the Single Row options for most photographic purposes)
Lasso Tools: Lasso, Polygonal Lasso and Magnetic Lasso
Quick Selection and Magic Wand Tools
Quick Mask
These are all illstrated in the screen grab below
Marching Ants:
When making a 'selection' the bounderies of the selected area become visible
by the appearance of 'marching ants' (yes, that's what they're called
- a throw back so far as I know to thelines (or rows) of ants marching
towards their destination in cartoon films such as Tom & Jerry - well
that's what I reckon anyway).
Marching Ants can also be hidden by View > Show > Selection Edges (this may vary in earlier vesrions of Photoshop). The quick-key is Ctrl + H, simple and quick to do and it's a 'toggle' so repeating the key stroke will show the edges once again.
Selecting the Entire
Image Area
The simplest
selection to make and it can be quickly done using Select > All, or
quick-key Ctrl + A
Marching Ants (selction boundaries) can be de-selcted by Selection > De-Select (or quick-key Ctrl + D)
Note: If, at some stage, a function or tool doesn't operate at all or as expected, check that you do not have a selection running (perhaps hidden). Using Ctrl + D will de-select even if you can't see the selection.
General information about selections other than Select > All
Inversing the Selection
When you need to inverse the selection - that is to say choose what's
outside the boundary rather than what's inside, then go to Select >
Inverse (quick-key, Ctrl + Shift + I)
Transforming the
Selection
If the selection needs to be geometrically modified (transformed) then
go to Select > Transform Selection and use the corner handles of move
away from a corner and rotate the selection.