'Levels'
Using the 'Eyedroppers'
Clive R. Haynes FRPS
Before exploring
how we can use the 'Eyedroppers' in the 'Levels' dialogue box to remove
or reduce a colour cast we need to look at how the 'Eyedroppers' are
used to set the 'Black Point' and 'White Point' of the image.
Please note that this section about 'Eyedroppers' to deal with 'Colour
Cast' by using 'Levels' can be also used when working with the 'Curves'
dialogue box.
Setting
points with the Eyedroppers
The three eyedropper icons in the 'Levels' dialogue box allow us to set
the black point and white point whilst the grey point
eyedropper is for setting a neutral tone of grey - and it's this facility
we'll be using to deal with 'Colour Cast' - as we'll see on the next page.
So for the present, we'll confine our 'Eyedropper' use to Black Point
and White Point settings.
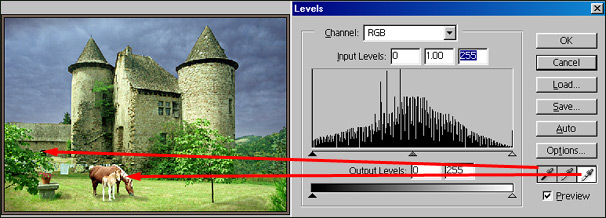
To use the an 'eyedropper', simply click on the one you need, then take the cursor into the image and click on the point you wish to set as absolute black and/or peak white. You'll see a change in the shape of 'Levels Histogram' and if using an individual Red, Green or Blue 'Channel', the black & mid-grey or the white & mid-grey settings for that channel will shift.

In the example below I first chose the black 'eyedropper' and taking the cursor into the image, I clicked on the black doorway to set the 'black point'. I then chose the white 'eyedropper' and clicked on the mare's man to set the 'white point'. The red arrow pointers below show the places I chose to set the two points.