Layers
The
Layers Palette - continued
A More Complex Structure
Clive R. Haynes FRPS
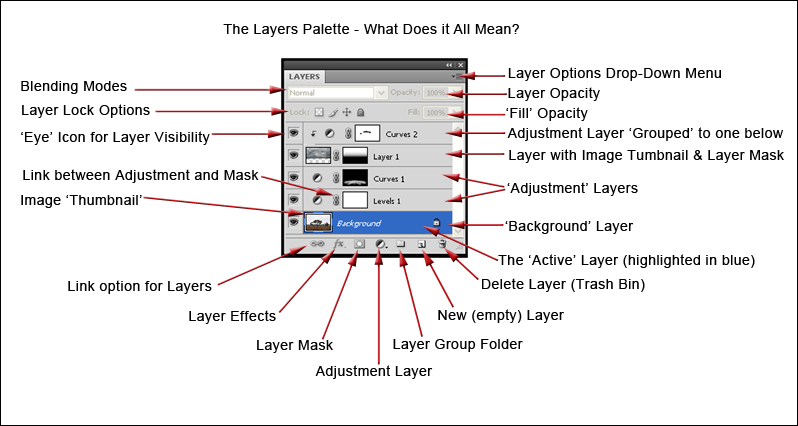
Continuing from the basic features of the Layers Palette, with a greater number and variety of Layers more explanation is required. In running through the order of features clockwise from the top right there will be some repetition of the information contained in the previous page on the topic.
Layer Options: Click on the drop-down arrow and a list of options will appear
Layer Opacity: Clicking on this will reveal a 'slider' control. The opacity of the layer can be varied from 0% to 100%. The opacity of the layer determines its strength / visibility. With settings less than 100% it becomes possible to see the image on the layer below.
Fill Opacity: This setting really applies to the use of 'Layer Styles' and 'Layer Effects'. From a photographers point of view it can be largely ignored, however I will return to it later.
Adjustment Layer 'Grouped' to the one below: The off-set Adjustment Layer icon and associated mask thumbnail together with the right-angular drop-down arrow all indicate an Adjustment Layer made as a Group ('clipped' to the layer beneath). This association is also known as a 'Clipping Group' and older instructions refer to the facility by this name. The idea of 'Grouping' is to associate the settings made on the Adjustment Layer only with Layer immediately below. If the Adjustment Layer isn't 'Grouped' in this way, then settings made will affect all layers beneath. Once an Adjustment Layer has been created, 'Grouping' can be made by the short-cut, Ctrl + Alt + G. This particular layer is for the adjustment of 'Curves'. 'Adjustment Layers do not contain pixels and are digital/numerical 'instructions' to affect the layer or layers below.
Layer with Image Thumbnail & Layer Mask: This layer is an 'image layer' and a miniature version of the image can be seen in the layer thumbnail. The 'thumbnail' rectangle to the right of the image thumbnail is a Layer Mask Thumbnail and it represents the sections of the mask that are active. White areas reveal the image upon the layer whilst black areas hide the visibility of the image. Shades of grey allow partial visibility. The nearer the shade of grey is to white, the stronger the visibility of the image on this layer, conversely, the darker the shade of grey, the more visible the layer(s) beneath. A 'Layer Mask' is an optional item and can be added to the image layer.
Adjustment Layers: Adjustment Layers always have a 'Layer Mask' associated with them. The 'Levels 1' adjustment layer has a mask that is completely white, this indicates that the entire layer is operating to full extent of its preset value. The Curves 1 layer mask has shades of grey, near white and black. The mask has been 'painted' using the brush tool with white and black as foreground colour to control the intensity of the adjustments made in specific areas of the image layer below.
At this point you're probably running out of screen space and it's important to keep the Layer Palette in view, please continue by clicking on the link .....