Layers The Basics ..... continued
The Hierarchy of Layers
Clive R. Haynes FRPS
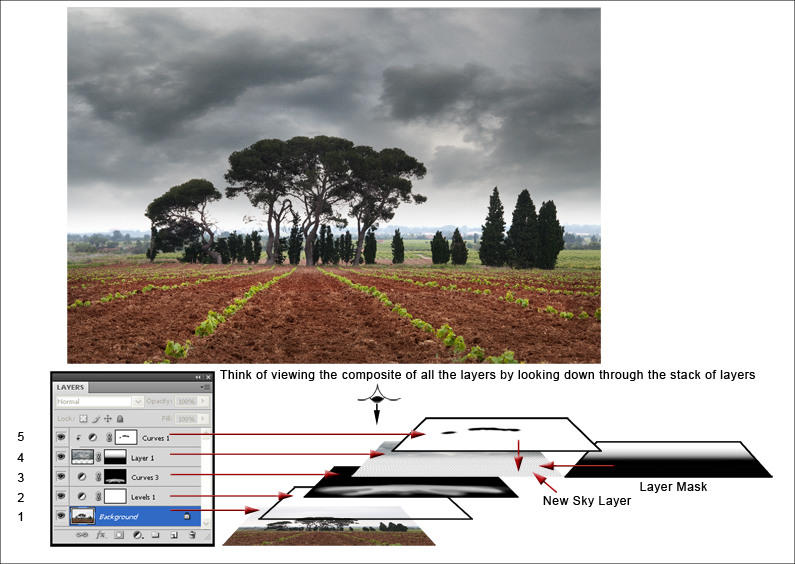
Taking the Layers in order from (1) 'Background' (the base layer) we'll move successively upwards to (5) the uppermost Layer. I have illustrated different types of layer.
I realise that the above image and it's associated layer structure introduces layers and concepts that will be unfamiliar, however the object of the exercise is illustrate the way in which layers are ordered in the stack and how it will help to visualise them.
1 The Background Layer: Notice the small 'Lock' icon: This indicates that the Layer is fixed and cannot be moved either within the layer stacking order or the image (pixels) moved within the frame area. It is possible to 'unlock' this Layer (double-click on the Layer and either rename it or accept the default name of 'Layer 0') Once unlocked, it behaves like any other layer in the stack.
2 'Levels 1': This is an 'Adjustment Layer'. It can be recognised as such by the half black/half white circle Icon. Notice the 'Mask' (white rectangle) to the right of the Adjustment Layer and 'link' icons. If the mask tone is white it indicates that the Adjustment is applied to the whole of the image area.
Note: 'Adjustment Layers' are not 'images', they do not contain any pixels - they 'instruct' the Layer(s) below how to behave. Additionally, they can be readjusted without any losses or deterioration to the pixel content of the image layers below, they are therefore known as 'non-destructive'.
3 'Curves': Another Adjustment Layer (notice the icon). Here the mask area is not white; it contains shades of grey and black. Black indicates no adjustment applied; shades of grey indicate a percentage of adjustment applied. Therefore, black = 0%, white = 100%, mid-grey = 50% and so on. Shades of grey approaching black reduce the effectiveness of the Adjustment Layer setting, whilst shades of grey approaching white increase the effectiveness of the setting. In this image the adjustment has been made to selectively increase the contrast in the field area. The adjustment was applied using a Brush Tool on the mask for this layer. By varying the opacity of the brush subtle changes and gradations of pre-set adjustment can be made.
4 This is an image layer containing the new sky for the picture. Notice that this Layer has a 'Layer Mask' associated with it. The 'Layer Mask' is the rectangle to the right of the image thumbnail and 'link' icon for this layer. Also notice that the 'mask' has a gradient from white to black. The 'mask' is giving information about how the layer will perform. In this case the 'mask' is instructing the (sky) image layer to reveal pixels where it's white and to mask (hide) pixels where it is black. The shades of grey will effect a transition between the two. A brush tool can also be used to reveal or mask (hide) parts of the image layer. Layer Masks are essential for making seamless montages and combination images.
5 Curves Adjustment Layer: This is another 'Curves' layer and deliberately 'Grouped' ('clipped') to only influence (instruct) the Layer immediately below. Notice the right-angular arrow and the offset, step-to-the-right position of the icon on this Layer; these are indicators of 'grouping'. Notice also the grey/black areas upon the 'mask' for this layer, these indicate where a brush tool has been used to selectively reduce and remove the adjustment.