Getting
to Grips with 'Layers'
Version CS2
A Basic Survival Guide to Understanding Layers
Clive R. Haynes FRPS
They are often approached with trepidation; this is unfortunate, as Layer principles are logical and amazingly straightforward. So with that in mind we'll proceed.
What
is a Layer?
The easiest way to visualise a Layer is to consider it as
a sheet of transparent film (just like an acetate sheet for an Over-Head-Projector
in the classroom or piece of Cellophane). This sheet can have an image already
on it, just like a colour transparency or be empty - waiting for an image to be
applied.
Imagine also that these sheets of film or Layers as we shall now call them can be:
- stacked one on top of the other
- made more or less transparent (opacity) so that the one(s) underneath may or may not be seen,
- labeled for identification
- re-arranged into any order in the stack
- made visible or invisible
- linked so that moving an image on one will also simultaneously move other images on correspondingly linked Layers
- partially or completely erased to reveal or cause to hide what is beneath
- independently changed in terms of many image adjustments (via the Image > Adjust menu)
- receive a 'cloned' (rubber stamp) image from anther Layer or another image
- made as a Text Layer
- allow the image on one Layer to be moved independently of another
- made to blend with the Layers beneath in many different ways
- independently deleted
- instantly copied to another layer
- 'clipped' (associated solely) with another Layer (Adjustment Layer)
- merged to fuse together
- either all layers or selectived layers
- copied
to another document (whether an image or an 'Adjustment' Layer')
- be
made into 'Sets' or 'Groups' (each set containing more Layers)
- the
Layer 'Transparency' may be 'locked' (to 'protect' pixels on a layer)
- the layer
may be 'locked' to prevent movement or to prevent further work upon it (V7)
- may be
created as an 'Adjustment Layer' (to keep 'adjustment options 'open)
- may be formed
into a 'Clipping Group' with other Layers (so as to only work 'in concert' with
specific Layers)
- may
be created as a 'Special Effects Layer' or 'Styles Layer' for the addition of
, 'Layer Effects', such as 'Drop Shadow', .Bevel &Emboss', etc. or 'Layer
'Styles' - of which there are many.
From the list above you can gain some idea of the versatility and amazing flexibility of Layers.
Where
to Start?
When you open an image in Photoshop it automatically appears
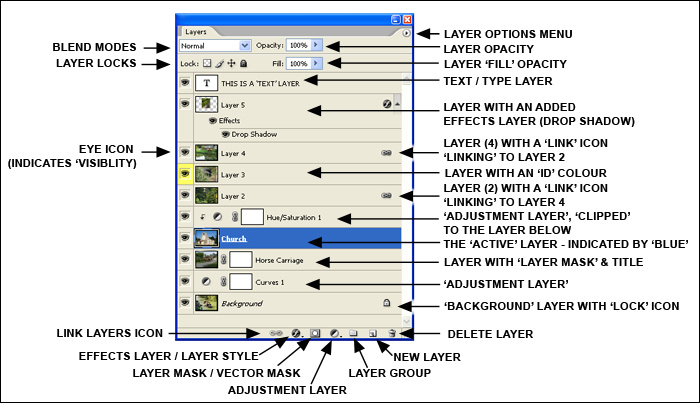
on a layer. Look at the layers palette and you will see it labeled as Background.
There are several ways of creating a new layer, experiment with these
-
a) Use a selection tool to
select part of the Background image. Next go to Edit > Copy, then Edit
> Paste and you'll notice that the area you selected and copied magically appears
upon a fresh layer (labeled Layer 1) above the Background Layer.
NB Notice that when you click on either the Background Layer or Layer 1, that the layer box turns blue. The blue colour indicates that this is now the 'active layer'. To make any layer active - that is to say that this is the layer that you have chosen to work with, it must be clicked on - the selected layer box becomes blue.
b) Go to Layer > New > Layer. This will create a new, blank, layer above the one beneath. So if you want your new layer to be in the right place, click on the one below (it turns blue) and make a new layer - it appears as the one above. New, blank, layers are useful for applying gradients to and for painting selective colour on (see 'Handtinting').
Should you inadvertently create a layer in the wrong place, this is no problem as you can move it - more of which soon. At present you only have two layers so you can't go wrong!
c) Click on the New Layer icon at the bottom of the Layers palette - see diagram
-
d) Copy and paste from another
image
Now
you see it - Now you don't
To make a layer visible or invisible - click
on the eye symbol to the left of the layer concerned - this switches the layer
visibility on and off.
Moving a Layer to another position in the stack
To do this you need to have three or more layers
Click on the one you wish to move (the box goes blue) and drag it to the new location - Tip: look at the hrizontal line that separates each layer, when you drag the layer you're moving over the diving line, the line becomes a pair of thinly separated horizontal lines, this indicates that you've passed the dividing point. Release the layer (unclick) at this point and the layer concerned will appear in the new location.
NB the layer labeled Background cannot be moved unless its name is changed to something else.
Remember that the top layer will always dominate the image - after all it is the one that's on the top of the pile!
What
you see is what you print
When it comes to make a print, you print what
you see. If a layer is switched off it will not appear on the print.
An Increasing
File Size
Remember that when you copy or add new layers this will
increase the file size of the image. This is logical, as more pixels are
being created to build the additional image layer.
To check on this go to
Window > show Status Bar and look to the bottom left and corner of the screen.
Here the image file size will be displayed as two figures. The left number
giving the size of the file if the image was occupying a single layer; the right
number showing the current size of the file, layers and all. Merging all or some
of the layers will shrink the file size. The lowest it can be is a single layer.
In this way you can keep a track on the size of the image and be aware of what
it would be if it were 'flattened' to a single layer.
Label
that Layer
If you only have a few layers operating then it's easy to see
which is which, however once you have many layers it's good practice to label
each layer so that you know what it is. To do this you need to display the Layer
Properties dialogue box and type in the name you want.
You can rename a layer by either going via Layer > Layer Properties or right-click on the layer and choose 'Layer Properties' from the menu. Whichever route you take, simply type the name you need in the 'Name' box - you also have the opportunity here to add a colour to identify the layer.
Alternatively, you can move your cursor over the name of the layer - that is, on the layer itself, in the layer palette, double click on the existing name and in the box that then surrounds the name, overtype the name that's already there with the new one - simple!
A Layer may be re-named whenever you wish.
Working
on the selected / active layer
The image on the layer you are working
on can be treated in much the same way as an image that isn't part of a multi-layer
structure - so you can pretty well do what you like with it. However you can do
many more things too. Here are some to explore.
a) Change the opacity of the top layer. Do this by clicking on the arrow to the right of the layer Opacity box and adjust the slider %.
-
b) Change the 'Blend Mode'
by clicking on the arrow to the right of the rectangular box labeled 'Normal'
(top LH of Layers palette). In the drop-down box that appears experiment with
selecting different blends and their effect upon the image. The interaction of
the blend mode with the layer beneath depends upon many factors including the
relative colour, hue, saturation and position of the layer images. You will find
plenty of scope here for weird and wonderful effects as well as many pleasing
subtle changes.
c) Copy and Paste a small section of image into the layer structure.
(Do this via - make a 'Selection' of the area > Edit > Copy > Edit > Paste)
As
soon as you 'Paste', as if by magic, a new Layer will automatically be made -
togther with your newly pasted imaget. Go to the move tool and position it somewhere
in the frame.
Try this:
Repeat Edit > Paste and the same image (stored
on the clipboard) will appear - again on a new Layer. Proceed and create a total
of three layers this way. So you now have a total of four layers, including the
'Background'
Next:
Experiment with the stacking order of the three
layers.
Next:
Activate any layer except the Background layer (as
it;s 'locked') then hold down the Ctrl key and left-click on one of the three
additional layers you've created and click again. You now have two 'blue' highlighted
layers.
Next, left-click on the 'Link' icon (look something like a small piece
of chain) at the base of the Layers Palette and immediately on both the (blue)
highlighted layers, the same 'link icon appearsappears. With this symbol visible,
you will now find that when you use the Move Tool that the two images so linked
will move together.
You can have many 'linked' layers but remember: the Background
layer is 'locked' and cannot be 'linked'.
Experiment with linking and unlinking
other layers. To unlink, highlight the required layer(s) as before and click on
the link icon at the base of the Layers pPalette the 'link' disappears.
Merging
Layers
To either save file space or when you are satisfied with the image
so far, layer and all, the layers created may be fused or merged together
in three different ways. Once layers are merged the resulting composite image
is ALL ONE LAYER and the individual components are no longer independent. So before
merging be very sure that this is what you want to do. If you're uncertain but
wish to experiment, then Save it as a Copy (via File > Save a Copy). Close
the existing image. Open the copy version and continue to experiment with this.
Later, if you wish, you can always delete the earlier version.
The four Merge options available (via Layer >) are:
Merge Down - this means that the active layer will merge to the one immediately below it.
Merge Linked - this enables the layers which have a 'Link' icon to be merged. This function is only available when selecting 'Layer > Merge' when working with the linked layer(s) in question.
Merge Visible - this enables you to merge only the layers that are actually visible. The Layers that are not visible are unaffected.
Flatten - this will collapse and merge all layers to the background. Even if there is no background layer (for whatever reason), 'flattening' the image will create a new Backgound layer. If you have any layers that are not visible the program will ask if you wish to discard these. If you don't wish to loose them, cancel the operation and make them visible before flattening.
More about other layer facilities including shortcuts, layer-to-layer cloning, adjustment layers, clipping groups, layer masks, text layers and 'effects' appear in 'Delving Deeper into Layers'.
Should you run out of space in the Layers Palette, simply drag the cursor slowly over the bottom of the palette frame. When you see the double-ended arrow drag the border to the size you need.