Curves
Clive R. Haynes FRPS
In our
exploration of 'methods of control' within Photoshop we've arrived at 'Curves'.
Let's recap.
Threshold
offers one slider for control
Brightness & Contrast
offers two sliders for control
Levels offers five
sliders for control
What
can 'Curves' offer???
Curves offer 256 'effective sliders'
control - Wow!
Quite
obviously it's impractical to actually offer 256 separate 'sliders' as they've
appeared, as individual sliders, in the previous dialogue boxes we've explored.
Curves shows it's 'sliders' in a different way.
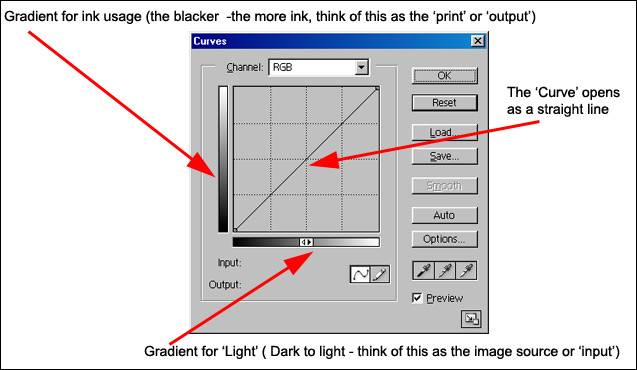
What 'Curves' does is to represent
the 'Input' (source) and the 'Output' (ink/printer) for the image along two axis
of a graph.
Upon opening the 'Curves dialogue box, the 'Curve' is a straight
line.
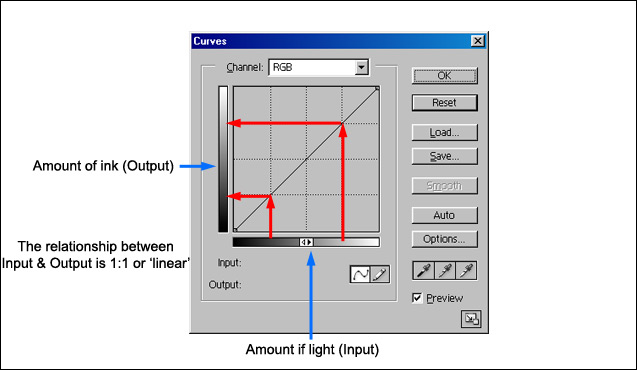
If we take any point along the gradient at the bottom (Input/source)
and extend that point upwards to the diagonal line, then read across to the left
gradient ('Output/printer) the two levels of tone will be the same along their
individual gradient scales. What this means is that the relationship between Input
and Output is unaltered (linear) and a 'straight', unaltered printed output will
result.
What 'Curves' allow us to do is to alter the relationship between
Input and Output at any point along the length of the straight line - and by doing
so alter the shape of this line (making it into a 'curve') and so altering the
input and Output relationship in a nonlinear way.
Let's begin by looking at
the opening state of the 'Curves' dialogue box.
A
technical aside (for the curious)
(You can skip this paragraph if you
wish and you'll be none the worse off)
So, where are the 256 effective 'sliders'
you ask?
As there are so many points of adjustment, the individual 'points'
become so close together that a straight line is displayed and that's exactly
what the diagonal line across the 'Curves' box represents.
Why 256 and not,
say, 300 or 400?
In Photoshop there are 256 levels of adjustment for the 'Luminosity'
(the underlying black & white / monochrome) component of the image so we have
control over each of the 256 'steps' or 'tones' from absolute black through a
multitude of grey steps to peak white.
However, unless we request the changes
we make to only affect the monochrome content, the composite image
- that includes the colour component (RGB), is adjusted over the range of 250
steps - more of this later. For now only accept this as a 'passing reference'.
Tech
bit over ....Continue.....
OK - so by adjusting 'Curves', what can we
do?
We can begin by making some simple changes to the shape of the straight
line - making it into a 'curve'.
By changing the shape of the line we alter
the relationship between Input and Output (Image lightness and tone compared to
Printer Ink).
Let's take a look at some examples.
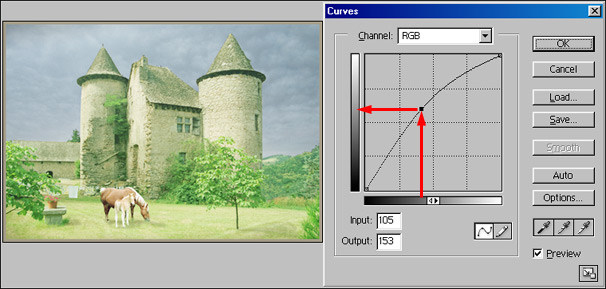
Look at the dark grey tones of the Input (base gradient) they have become light grey tones on the Output (side gradient). The image becomes lighter and will print this area with less ink and as the curve is no longer straight, other areas will also be affected and lightened. However, the two 'ends' are fixed so the black and white points remain set.