Sharpening
is frequently essential, however it can cause a variety of problems.
Sometimes the sharpening is simply overdone - the image appearing unnatural
by virtue of its over-sharp definition.
At other times the sharpening process also enhances (sharpens) inappropriate
and unwanted areas such as 'noise', (possibly 'film grain') and skin texture
(exaggerating blemishes and being generally unflattering).
However, there are times when selective sharpening is inappropriate or just plain too fiddly - these are cases where the sharpening really only needs to be applied to small structures and edges, such as masts, rigging, a network of cables, etc. I describe below a method that will apply sharpening to multiple edges and small fiddly bits all in one go.
Follow these instructions
to control how much sharpening you apply by addressing principally 'edges'.
We'll be generating a high-contrast mask and using the 'Find Edges' filter
in combination with the 'Unsharp Mask' filter.
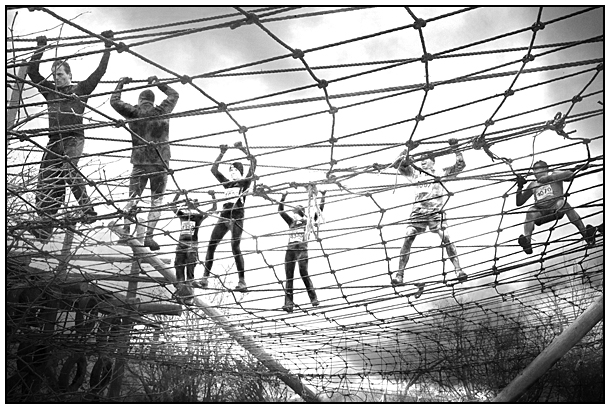
The Image
The example image for this series is 'Spidermen', a picture I shot an
a cold dull day at ISO 500 1/1000 sec at f9.0. As you can imagine there
is a little 'noise' in the sky and other areas - not much perhaps and
barely discernible to the critical eye at 100% (Actual Pixels, Ctrl+ Alt+0)
display on the monitor. My task is to sharpen the rope structure and some
other edges without sharpening any 'noise' in the sky.
The Method
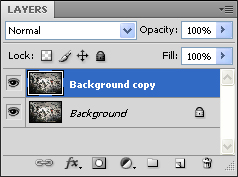
Open the picture, this may be a 'Background Layer' but it doesn't have to be.
Make a copy of the image layer (click & drag Background Layer to the New Layer icon at base of Layers Palette next to Trash Bin or via Layer > New > Layer by Copy). The copy layer needs to be above the original layer.
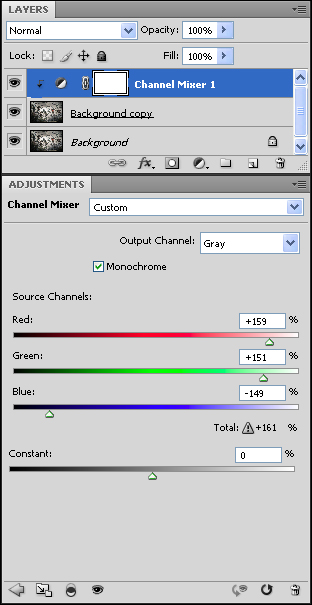
Click on the Adjustment Layer icon at the base of the Layers Palette and from the drop-down Adjustment Layer menu choose Channel Mixer.

The Channel Mixer Adjustment Layer must be made as a 'Group' (sometimes known as a 'Clipping Group') with the layer beneath, for Photoshop 'CS' versions, use Shift+Ctrl+G as a Quick-Key. For earlier versions hold down the Alt key whilst passing the cursor between the two layers (Adjustment Layer & Copy Layer) in the Layers Palette, when you see two overlapping circles appear, left click, and the upper and lower layers will be 'clipped' together.
When 'Grouped' (or 'Clipped') a downward arrow will be shown shown in the upper layer.
Refer to screen-grab
below
NB If 'Grouping' ('Clipping') is not done, the Channel Mixer setting
will affect all layers beneath and not just the one you wish to
alter!
In the Channel Mixer dialogue box, click 'Monochrome' - see below.
Don't forget - this is an Adjustment Layer so when you wish, you may return to it again to refine the adjustment made