The 'Art
History Brush' ![]()
Continued
(page 3)
Clive R. Haynes FRPS
Managing
and Editing the Numerous Layers
Switch off all the layers except for the
'Background' and the first layer (Layer 1) you began painting on.
Apply a
Layer Mask to Layer 1, and using a 'normal' brush set to a 'normal' circular tip
shape' or 'arty shape', if you prefer, and erase and restore sections of the 'Art
History Brush Layer 1' by swapping between black and white as the Foreground colour
(Tip: the 'X' key makes the swap easy).
When you are happy with the result,
switch on the second 'Art History Brush Layer (Layer 2) and repeat the procedure.
Continue to add Layer Masks to each 'Art History Brush' painterly layer until the picture is more or less as you require.
The image below shows the more artistic version we now have.

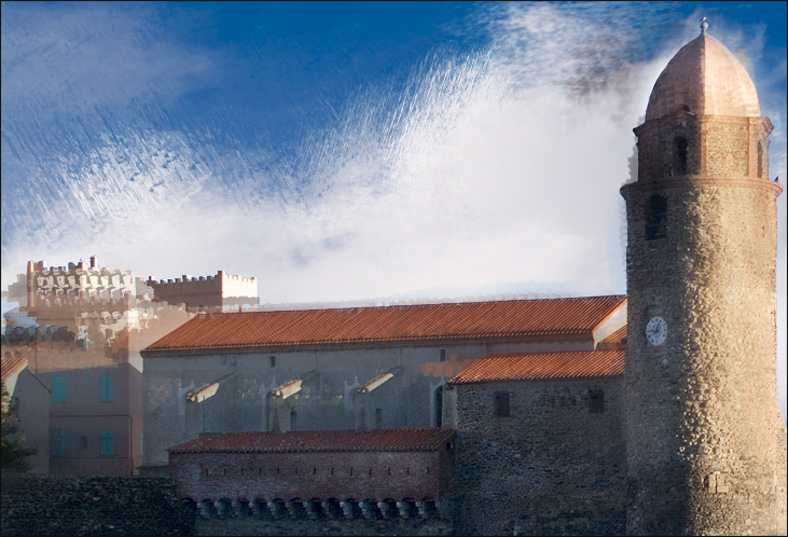
Details from the above picture illustrating brushwork - Note changes in brush 'style', 'direction' and 'size' to suit different parts of the image and underlying texture.
Make
a 'Layer Group'
To do this, Ctrl + Click each 'Art History Brush Layer'
and when they are all 'highlighted', drag the set of them onto the 'Create New
Group' icon at the base of the layers Palette, it looks like a 'Folder'. Doing
this will neatly tidy away the stack of 'Art History Layers'. They can be revealed
and hidden by clicking on the Group Layer 'arrow'. One great advantage in making
layers into a 'group' is that a 'Layer Mask' can be applied to the 'Group Layer'
and by this means the whole 'Group' can be treated as a single layer with all
the usual advantages of layer masking. And what's more, the individual Layers
within the Group remain editable - individual 'masks' included.
If necessary, add Adjustment Layers to improve tonality, Hue & Saturation, etc as required.
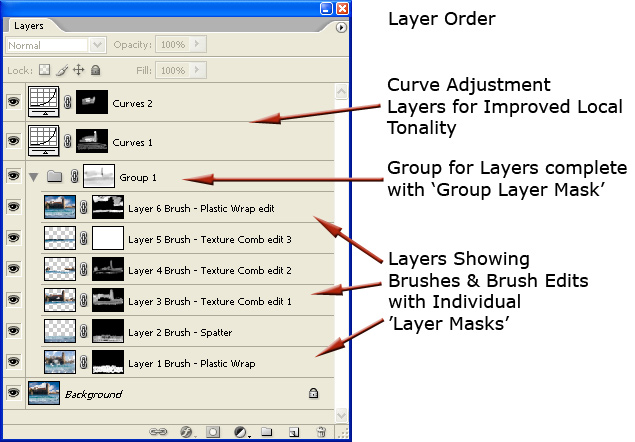
The 'screen-grab' below illustrates the 'Layer Order' for the above image.
Blending Modes - an Option Experiment by using different Blending modes for the 'Group' layer or individual layers.
When 'painting' with the Art History Brush, experiment by trying different 'Blending Modes' by clicking on the 'Mode' option on the options Bar for this brush.
Have fun with this tool - many exciting, artistic, creations beckon!
The
next page shows 'before' & 'after' pictures and some of the brushes used in
their creation -
Plus a 'Bonus Item!'
Please click on the 'link' below...